|
|
||||
|
DAW Controller The DAW control part of the app is functionally compatible with a Mackie Control Universal (MCU), which has become the 'de-facto standard' hardware control surface for most DAWs. It gives you control over the DAW's mixer, transport, EQs, plugins and instruments. You will be able to save projects, perform undo's and redo's, switch between windows etc. What exactly is accessible and how exactly it is done depends on the controlled DAW and its Mackie Control implementation. TouchDAW does neither define that functionality nor can it change much about the way your DAW's authors want their product to work with a Mackie Control. It is therefore very much recommended that you read up on your DAW's Mackie Control support in its manual. This app manual will not go into DAW specific details too much. DAW Presets TouchDAW's DAW presets do not change much about the app's inner workings. What the presets primarily do is relabel all the buttons in the master section to match the separate DAWs implementations. Additionally they will make DAW specific button combinations and assignable functions available. One noteable exception in this regard is the 'Pro Tools' preset, which changes the communication protocol to HUI and makes the app emulate an MCU unit in HUI mode. To select the DAW preset go to Setup / DAW Controller and set the 'Sequencer' preference. DAW-side setup instructions, links to manuals and videos are given on the DAW Setup page. Note that support for some DAWs has been deprecated. The presets won't go away, but they are not tested and maintained any longer. DAW Controller Screens
TouchDAW 2.2.5 removes the separation between phone and tablet apps. With the advent of 'foldable' devices the border between device categories blurs and maintaining specific functionality for single device types neither makes sense anymore nor would it be sustainable. All devices will now get the same 'full' control surface in more or less 'unfolded' form. 'Full' control surface refers to what you would see on a tablet in landscape orientation:
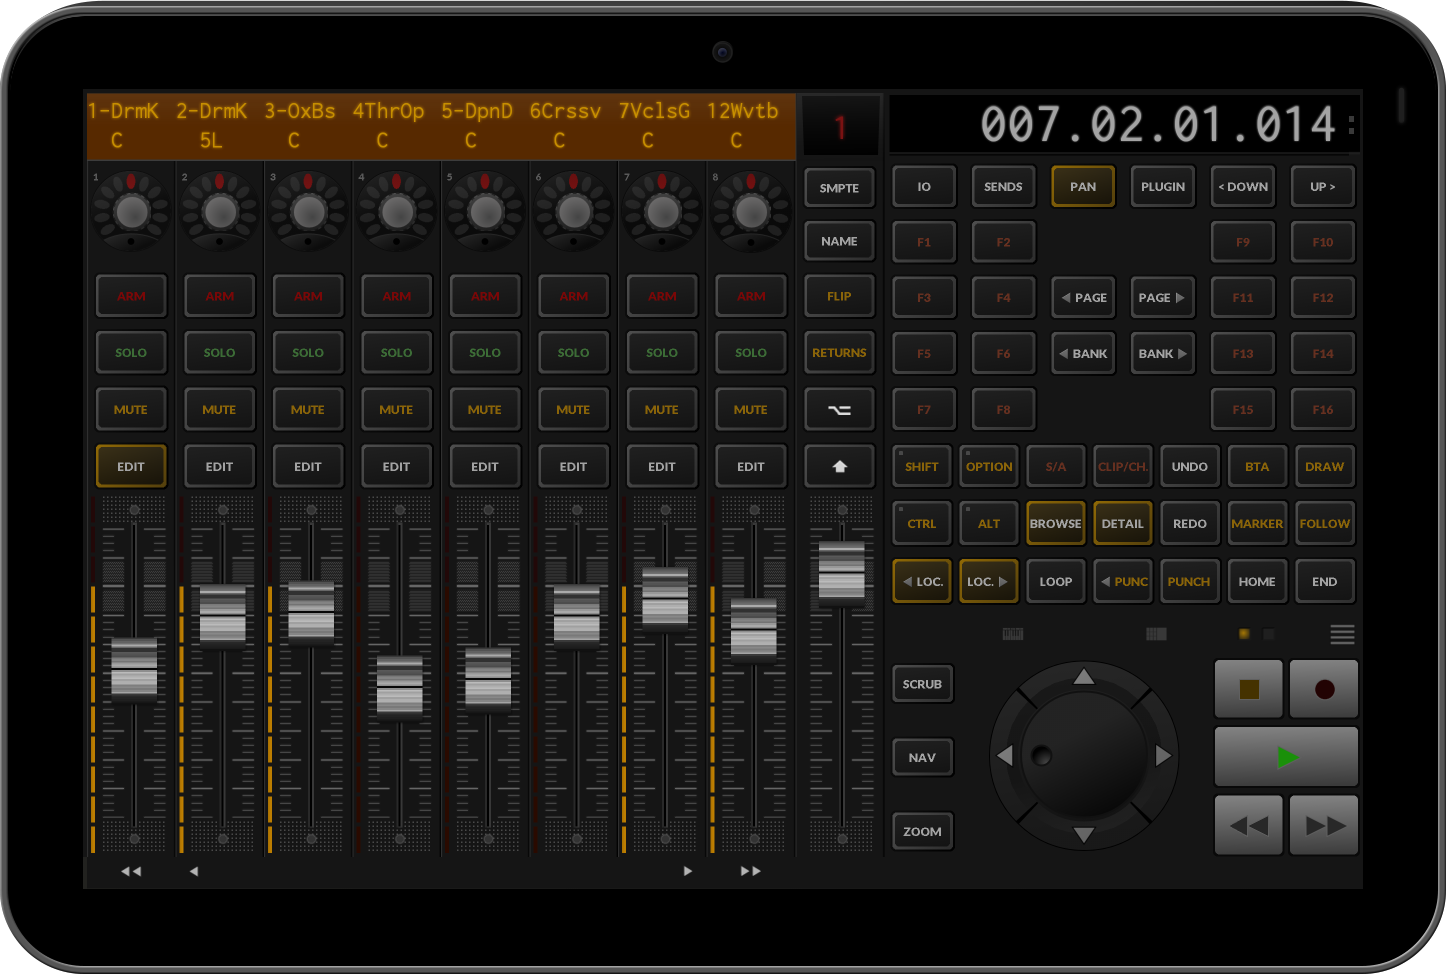 These main functional blocks are then arranged in various forms depending on available screen space and will dynamically adapt to changes in a device's characteristics. Phones On a standard phone things will be split into two swipeable halves that are not too far from the removed 'Mixer' and 'Transport' screens of previous versions. 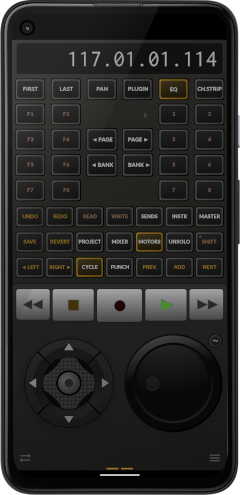
To switch between the two parts use either the double-arrow button in the bottom-left corner, swipe underneath the transport buttons / jogwheel or do inwards edge swipes in the lower part of the screen (~ 200px, everything above is reserved by Android for its 'back' gesture).
If you happen to have 2 devices at hand and use one of the Network MIDI options, you can use both parts in parallel.
The mixer part is scrollable, but also contains on-screen controls to change the number of simultanously visible channels up to all 8 + 1. (+ and - here refer to the number of channels shown, not the zoom-level) The master channel by default is locked in place, but can be set to scroll with the rest of the channels. There are further options to make the mixer half serve different purposes from being more of a channel-strip interface to just acting as a MCU extender. See Mixer View Options
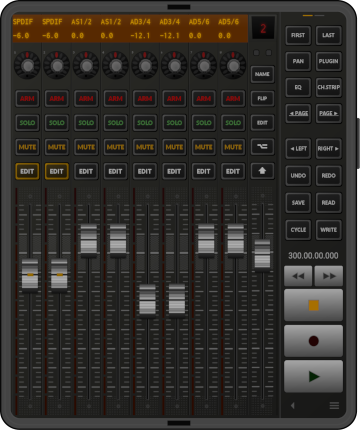
The portait variant of this split control surface is also used on tablets in portrait mode where the mixer part will always show a minimum of 8 channels and the master channel can just be toggled away.
Foldables On roughly 'square' screens (like on an unfolded 'foldable'), the two halves will be arranged next to, resp. on top of each other with an option to collapse the transport part and show the full mixer: 
Mixer View Options
Many aspects of the reduced mixer-views are individually configurable using the 'Mixer View Options' preference at Setup / DAW Controller: You can remove the button rows at the top and bottom or add another one underneath the mixer. The large transport buttons can give way to an additional (2*) 4 assignable buttons. Encoders are moved down on phones by default to bring them more into thumb's range, but this also is user-configurable.
Slightly different options will be available depending on the current device type.
The 'Tablet Layout ' option available on phones will replace the split variant with the 'full' tablet view when the device is in landscape orientation. 'Show Track Colors' lets the app make use of the additional sysex that some of the newer MCU knock-offs introduced to color their displays. This will in most case require a custom or vendor supplied Control Surface script! TouchDAW understands both Behringer's protocol extension (addressing seven predefined primary colors) as well as the one introduced by the iCON V1-M, which transmits 21 bits of color information. Colors are applied as channelstrip backgrounds with a tuned down alpha amount. You can raise the color intensity @ Setup / Global / Theme / DAW Controller Colors if it is too low for your taste. Overlay Fader The large overlay fader shown in the illustration replaces much of the 'channel strip' functionality of previous versions and is primarily meant to provide a long throw interface for smooth automation rides. It is available on all variants of the DAW controller except from phones in landscape mode where the fader would only be marginally larger than the fixed ones and just looks stupid. 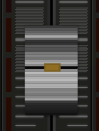
To bring it up, double-tap the selected channel's fader knob, which will be 'illuminated' to indicate the option. ⇨ Once it is showing you can double-tap any channel's fader knob to link the overlay-fader to another channel. By default the fader is set to follow DAW-side track selections. You can turn that off and lock it to a channel by touching the LED-like thing at its top. If you rather want the fader at the right side of the screen, touch it at the very bottom to move it between left / center / right. Touching anywhere into the 'background' (incl. the fixed faders' tracks) removes the overlay fader. Its last position is stored and it will come back up where you left it. Transport View Options
As the transport view may be a little crammed on phones and foldables you can optionally hide groups of buttons, which will in turn enlarge the remaining visible ones. This is controlled by another 'multiple choice' preference at Setup / DAW Controller.
Because the various DAWs spread their functions across the master section in vastly different ways, these options will probably not be granular enough to give you exactly the buttons you would want right away. You can use the block of assignable buttons to resurface functions that get hidden with the group they live in. See the 'Undo', 'Save' and 'Write' keys in the screenshot as an example. If you assign one button to the app's 'Alt' key there will be 2 * 7 freely assignable buttons left.
If you want even larger transport buttons, there is a fully customizable 'Large DAW Transport' preset available on the Workshop screen. You can also assign DAW transport functions to the Pad controllers on the XY-Pads screen.

Encoders
Endless encoders on the original hardware can not only be rotated, but also act as push-buttons. To execute that function in TouchDAW, double-tap an encoder. Alternatively you can use the 'Alt' button on the master channel to switch all encoders into V-Select mode where a single touch performs the click action. There are some further encoder related preferences at Setup / DAW Controller / Encoders:
Banking And Paging
The 'control surface window', ie. the eight channels currently under control, can be moved over the DAW's mixer in steps of 1 or 8 channels . Many DAWs will draw a colored line underneath the faders on their mixer to show where a control surface currently sits: 
To move that window over the mixer use:
If you have more than one (Mackie) control surface configured in the DAW, the control surface window will be 16 or 24 channels wide and all controllers will bank together.
Internal Modifiers The two untitled buttons with the Alt ( ) and Shift ( ) icons on the master channel do not perform any MCU actions, but are internal modifiers. The Alt button switches assignable buttons to their second function and all encoders to v-select mode (alternatively encoders can be double-clicked at any time for the "press v-pot" functionality of the original hardware). If the touch interaction mode for encoders is set to "Toggleable" (Setup / DAW Controller / Encoders) then touching the Alt button again both unsets the v-selection mode and toggles interaction between circular and linear (up-down, left-right). The Shift button switches the mixer part into MIDI mode. Lockable Buttons Buttons showing a little square in their top-left corner can be locked in pressed state by double-tapping them. This is occassionally used on modifier buttons: Having to hold one button while pressing another or turning the jog-wheel can be a little awkward on touchscreens. Once locked, the next touch event on the button unlocks it and only then it can again be used as normal. Lockable buttons will execute single clicks with a little delay. Be aware that they can cause confusion when one forgets to "unpress" them. Assignable Functions
All buttons on reduced mixer views that do not belong to channels are user-assignable. In the master section there is an optional block of 8 freely assignable buttons.
Assignable buttons have a second function accessible via the 'Alt' button. All together there are 2 * 32 buttons that you can assign the functions you frequently need to.
Assignments may include modifier keys, can call DAW-specifc button combinations and may provide shortcuts to other screens or utilities in the app. Most buttons have default assignments, many of them also a second one. If you do not like those or maybe would want them at some other place, nothing should stop you from setting things up in exactly the way you want.  ... button combinations ...
 ... app shortcuts ...

 To edit function assignments bring up the menu and touch the wrench icon titled 'F-Assign'.
▶ On the full tablet view and the transport half of split surfaces 'F-Assign' will only be present when the block of assignable buttons is shown.
All assignable buttons currently on screen will then blink for a couple of seconds to identify themselves and some brief instructions will be shown in the text displays. As said there: Touch the button whose assignment you want to change and a dialog containing a long list of functions will come up. ⇦ Here you can select from three groups of actions: ● All the functions that the DAW's Mackie Control implementation makes available on a button in the master section. Selecting one of these effectively turns the assignable button into a clone of the corresponding master section button. While doing so on the master section itself may not make much sense it allows to replicate the most frequently needed functions on the mixer view, which will make frequent screen changes unnecessary. Besides that, every function can be combined with one of the modifier keys that a DAW may support. This will eliminate the need to hold down one button while pressing another and can make sense even on the master section. 'Modified' buttons generally show underlined text. ● Predefined DAW specific button combinations. These are mostly button / modifier combinations that the supported DAWs use to perform standard tasks like setting or locating markers, setting automation modes etc. What is available here is very DAW specific. Most options in this block will use unicode icons to label buttons, because descriptive text would be far too long. You can add your own definitions to this block. See Editing DAW Profiles ● App shortcuts If you need to frequently switch between the DAW controller and any of the MIDI controllers these can avoid having to bring up the menu. At the bottom of the dialog you will find controls to select modifiers and make buttons lockable (only enabled for the first of the above groups) and assign the currently edited button to a group (which here only refers to visual grouping by setting text colors). 'OK' or 'Cancel' your edits when done and proceed with the next button you want to change. 'Clear' removes a present assignment. ⌥ / Alt / Option All assignable buttons have a second function layer that is brought up with the '⌥' button above the master fader. When not in edit mode only those buttons that actually have a second function assigned will change when engaging '⌥'. In edit mode '⌥' switches all buttons. Those that lack an assignment will show "- ? -" and can be assigned (or continue to be ignored). To exit edit mode touch the hamburger menu or double-tap into the 'background'.
All function assignments are stored 'per DAW'. You can create completely different setups for DAW A, B, C, etc., but may need to make some assignments that you would want to be the same repeatedly.
|
||||
|
Editing DAW Profiles
You can customize button titles, color grouping and lockability of most buttons in the master section by editing xml DAW profiles. This also allows to define additional button combinations that can be triggered from assignable buttons:
The 'Sequencer' preference at Setup / DAW Controller contains an entry labelled 'Edit Selected' at its very end. Select it - after your sequencer setting has been loaded - and the DAW's xml will be loaded into the xml editor. The included "MyCustomDAW" profile contains comments and explanations and may serve as an example or template [ Show ]. Saving the xml under a new name will create a new 'custom' DAW entry, overwriting it without changing the name will alter the build-in profiles. You can also add externally created or edited xml files. DAW profiles are stored in the 'daw_profiles' subfolder of the app's private storage space. See Files for details.
Custom profiles always run in Mackie Control mode. It's not currently possible to create alternative HUI profiles.
Other DAW Controller Preferences
Settings under 'Behavior' control initialization aspects etc. :
|
||||
|
|
||||