|
|
||||
|
Workshop The Workshop screen is a 'blank slate' available for creating custom controllers. Functionally it is mostly identical to XY overlays and the customizable controller underneath the keyboard. When you first open it, you will see an assembly of buttons and faders. This is not meant to be a meaningful controller (allthough it is functional), but just wants to show some of the controls that are available to built your own controllers. To start editing, double-tap into some free space and select 'Edit' from the menu. This will bring up the editor dialog. You can then start to change the controls' properties, rearrange them on screen or load some other preset. Details on editing controllers are given on the Custom Controllers page. Controller definitions for the screen are stored in "controller" nodes inside the "workshop" node of the currently selected XML setup file: |
||||
|
Presets The screen comes with a number of presets that serve two purposes: A. provide some additional readymade controllers and B. demonstrate layout and MIDI techniques. Some are just templates, some only snippets meant to be extended. You are encouraged to play around with them using the editor and the xml itself and change things to your needs. If something breaks, you can just call up the preset again. If you break the xml in a way that tilts the editor, open the current xml file from Setup / MIDI Utilities / XML Mappings and either try to fix the error there or delete the whole '<workshop></workshop>' node or the '<controller></controller>' node inside it and start over again. |
||||
|
D5 (Plugin Controller) This is a simple emulation of the discontinued MCU plugin controller. The layout is built to adapt to both landscape and portrait modes. It is better suited to tablets, but should scale to phones. 
The controller uses the app's second MIDI connection. It is effectively another full-blown DAW controller, though and - per Mackie's & Apple's definition - requires a MIDI port exclusively for itself. When using it you should not use other parts of the app running over the second port (ie. the Keyboard and XY-Pads screens and the Mixer in MIDI mode) anymore, because the DAW will consider all MIDI coming in over that port as 'remote control data' and messages that are not defined in context of the protocol may in the worst case crash the DAW. The query response option is used to make DAWs accept and activate the controller, see the xml's 'emulation' node. [Details] The V-Pots on the hardware can not only be rotated, but also have a press function. DAW implementations for the controller use that a lot. Like on TouchDAW's main screen you get the same functionality here by double-tapping an encoder. Custom controllers can not run any initialization sequences so far, you may need to press some buttons in the 'Assignment' section to make the DAW send some data initially. The original hardware was a versatile piece of gear, accompanied by its own configuration software (the 'C4 Commander') and a concept of extensibility in the background. This emulation only replicates the basic UI functions. Unfortunately the controller was never very well supported across DAW products. Basically only Logic, Cakewalk and Reason come with built-in support for the C4. Here is how a setup with these products would look like: Logic: There is no autodetection support for custom controllers so far, this needs to be set up manually or via scans. From the 'Logic' menu select 'Control Surfaces', click the 'New' dropdown at the top of the upcoming window, select 'Install' and choose 'Mackie Control C4' under the 'Mackie Designs' manufacturer entry. Then either use 'Add' and set the MIDI in- and outputs to the second RTP session (or whatever port you have the app's second port connected to) or try 'Scan', which should automatically set the ports if sucessful. 
Logic's C4 implementation is documented in a pdf file available on Apple's website (Chapter 15, pages 180ff.). Please do read it. None of the rather complex functionality available here has been my idea. Cakewalk: Open the DAW's preferences and select the 'Control Surfaces' tab. Click the yellow star-like icon at the top-right side, select "Mackie Control C4' from the 'Controller / Surface' dropdown, set the appropriate MIDI ports and click OK. The preferences page will look something like this then: 
(Using mnet / MIDIHub here and also showing the app's regular DAW Controller part as the first control surface. This is NOT required for the D5 preset to work!). Some buttons - or rather V-Pot press actions - can be customized via the control surface properties window that can be launched from the 'ACT' tab in Cakewalk's upper toolbar. Please read the Cakewalk C4 documentation! All functionality available here is defined by the DAW, not by the app. Find it at 'Program Files/Cakewalk/Shared Surfaces/MackieControl.chm'. Reason: Open the preferences and switch to the 'Control Surfaces' tab. If the app's second MIDI port is connected you can use the 'Auto-detect surfaces' function (takes some time. Reason will send the same device inquiry message about 40 times until it reaches the 'Mackie C4' entry in its control surfaces list and accepts the return). Alternatively hit 'Add manually', select a Mackie C4 and set the correct MIDI ports. Make sure the 'Use with Reason' box is checked. Screenshot: 
What the controller can do depends a lot on the Reason device it is linked to. Generally you get quite deep access to synth parameters via the v-pots. Please see the Reason C4 documentation for details. |
||||
|
Totalmix Control Remote controller for the TotalMix software coming with RME audio interfaces. Built to adapt to both landscape and portrait orientations and usable on tablets and phones. 
This runs over the second MIDI connection. It mainly uses RME's generic MIDI API, which unlike the Mackie Control implementation allows for simultaneous access to all three fader rows, but unfortunately does not give feedback. May control up to 32 stereo pairs per row using the app's MIDI channel offset functionality and can access 8 submixes. The controller does not yet give access to input gains, but that could be added if needed. Please see the 'MIDI Control' chapter in the Totalmix part of your interface's manual for details. Some of the buttons (namely Snapshots) will only be functional if you also enable Mackie protocol support in the Totalmix settings. That will also allow for feedback on some of the other buttons.  To set this up open the Totalmix 'Settings' dialog from the 'Options' menu and select your MIDI ports on the 'MIDI' tab. Please note that Totalmix will refuse to see mnet / MIDIHub ports (because it's too cheap a MIDI driver... No support for WinMM ports here as it seems). To use this over WiFi you will need to run rtpMIDI when on Windows. To set this up open the Totalmix 'Settings' dialog from the 'Options' menu and select your MIDI ports on the 'MIDI' tab. Please note that Totalmix will refuse to see mnet / MIDIHub ports (because it's too cheap a MIDI driver... No support for WinMM ports here as it seems). To use this over WiFi you will need to run rtpMIDI when on Windows.
The app's main DAW controller screen can be used to control Totalmix via MCU protocol on MIDI port 1. |
||||
|
DJ Controls A landscape only emulation of (parts of) a Hercules RMX2 controller. Most DJ programs should have a preset for that device. Centered controls (EQ knobs, pitch- and crossfader) recenter on double-tap. Runs on the app's second MIDI connection. 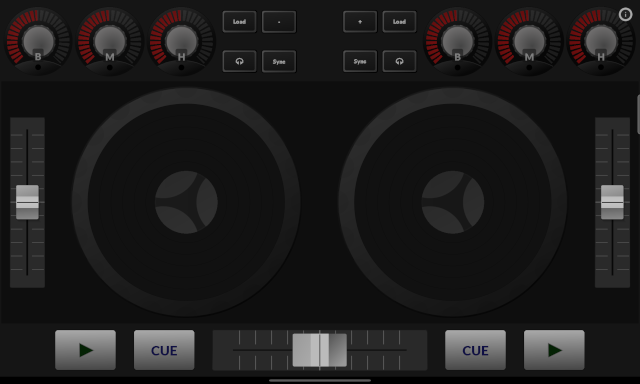
Here is how this is set up in Mixxx, where it will work with feedback (highlighting, blinking) on the transport and sync buttons. Fader and poti feedback support would need to be added to the controller script (ie. the app would support it if Mixxx did): 
|
||||
|
Channelstrip An alternative channelstrip for phones in portrait mode. Only uses 'DAW Control' messages and works entirely over the app's first MIDI connection. 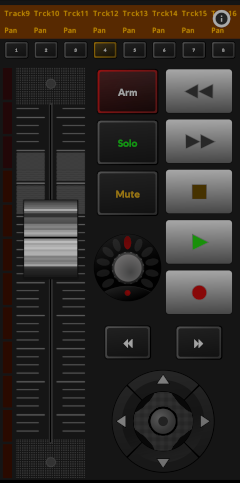 I had never really been happy with the way the main phone screen displays text information. The MCU protocol simply is not made for isolating single channel stuff out of the display strings and in the end you just need the full display to make sense of what a DAW tries to communicate. On the other hand a phone screen always was and remains to be too small for a full 8 channel display. So in the end this is just another compromise, but one that can be changed.
This makes a lot of use of "selected channel" options available with most "DAW Commands". Unlike the main phone screen it knows nothing about implementation details of specific DAWs. You may need to change some navigation options as not all DAWs will use the navigation cross to step through channels. There are no automation, locator, loop, window etc. functions as those will all be DAW specific. It also won't automatically bank when stepping out of the current control surface window (but this can be done by enabling the app's "Autobanking" option) Finally this may serve as an explanation for why TouchDAW does not allow to use the phone layouts on tablets: Open this on a tablet and it will just be a totally disproportionate eyesore. |
||||
|
Cubase / Nuendo control room remote 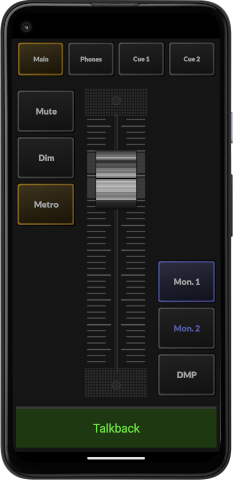 An example controller for a basic control room setup using the MIDI remote APIs in Cubase and Nuendo 12+. Download the .midiremote 🡇 collection, import 'Cubendo CR.midiremote' and select the MIDI ports for the app's second MIDI connection in the remote settings. See Steinberg's documentation for general MIDI remote information and import instructions.
The layout provides a large talkback button and gives quick access to common Control Room functionality like adjusting monitor volume, toogling the metronome, selecting speakers etc. Control rooms of cource are individually defined. This will probably not immediately match your setup and need adjustments to both the layout and the DAW-side script. After importing the .midiremote definition you will find uncompressed javascript code in Cubase's scripts folder and can edit it in place. |
||||
|
Pad Grid
This basically is a generic grid template that can be used as a startpoint for evenly spaced controller layouts. It is also meant to demonstrate dynamic relabelling and coloring and how DAW-side scripting can complement custom controllers and turn such plain setups into totally different things. 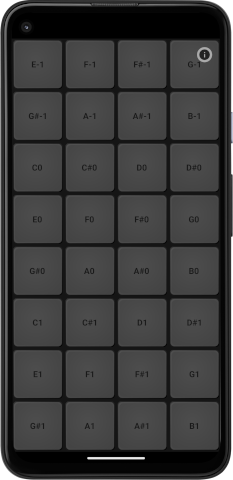
Cubase / Nuendo The related .midiremote script 🡇 uses 'command bindings' to transform the template into a 4 page shortcut utility that performs actions usually called via key-commands (basically what people buy those 'Streamdeck' devices for, I guess). Only the first two subpages are - a bit 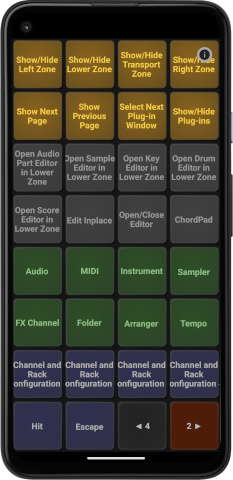
arbitrarily - premapped and most likely will not cover your needs. To change the bindings and fill the empty pages edit the javascript code (the DAWs' mapping assistant does not support subpages). Bitwig The preset's associated Bitwig script 🡇 turns the template into a quick and dirty, 32-bit colored pocket cliplauncher with scene-start, track-stop and box navigation buttons. A proper cliplauncher of course should be larger, have scene-start buttons arranged 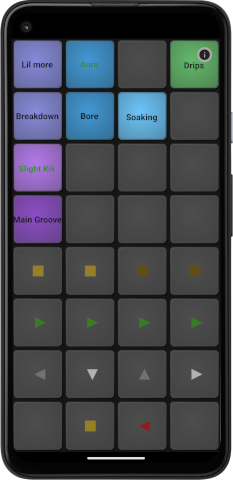
vertically and contain some more functionality. I am not really familiar with Bitwig's controller APIs so far (quite like it, though). This might get extended at some point, but feel free to use the script as a startpoint for your own variants. |
||||
|
Chords 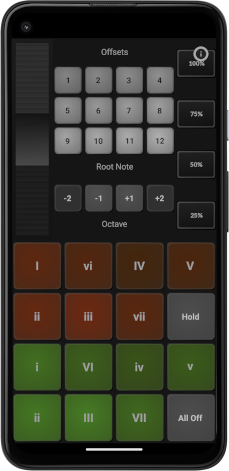 This demonstrates the 'chord' actions new in 2.3.1 with two simple major & minor chord progressions in the lower screen half. It will take a sound generator with decent polyphony to be of any value.
The upper part uses 'Exclusive Groups' and 'Data Offsets' to manipulate the note range of the triggered chords. The 'Root Note' group is set to work in absolute mode and will offset the chord pads by 1 to 12 semitones. The 'Octave' group operates in relative mode. Its values will be added to the absolute offset set by the upper group. Unlike the 'Root Note' group, the 'Octave' group does send 'Off' states for buttons that get deactivated: Before a new octave offset becomes active, any previously set one will be substracted again. Buttons on the right hand side show how an exclusive group can be used to set a variety of fixed controller values instead of using a linear input control like faders or pitchwheels. The group does not send off states when the selected button changes, so the emitted Modulation value will directly transition from 25 to 50 to 75 and 100 percent and only get reset to 0 when the currently pressed button is explicitly turned off. |
||||
|
Cubendo AI Fader 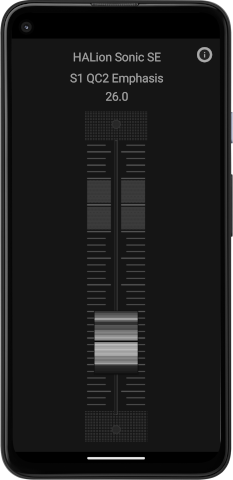 Emulation of the 'AI Knob' on the discontinued CC121 hardware controller. Controls the 'value under mouse pointer' while also showing its name and value.
The related DAW-side script is included in the Cubendo .midiremote 🡇 collection. See the readMe in the archive and Steinberg's documentation for general MIDI remote information and import instructions. |
||||
|
|
||||